TPM 101: A Beginner's Guide to TPM Measurements
In my previous article, we delved into the fundamentals of TPM (Trusted Platform Module) and its indispensable role in bolstering security. Today, I want to shift gears and explore a concept known as measurements.
While TPM typically handles encryption and key management, measurements takes things a step further by providing a mechanism to calculate the integrity of software components . So, what does that actually entail, and why is it so crucial? Let’s unpack it together.
All the commands mentioned in this article are on OpenBMC software running on an actual BMC (ast2600) connected to a
Nuvuton NPCT 75xx series 2.0 TPMvia I2C. The commands are not tested on any other versions other thanOpenSSL 3.3.2,tpm2-openssl_1.2.0,tpm2-tss_4.0.1,tpm2-tools_5.5,yocto (scarthgap)
Measurement
In the context of security, measurement refers to the process of capturing and recording the state or configuration of a system at a specific point in time. These measurements are usually a cryptographic hash of the system’s state (like the configuration, files, or software). The idea is to track changes and ensure that nothing has been tampered with.
Generating Measurements and Extending in desktop linux
In a basic Linux environment like ubuntu, you can simulate the concept of “measurements” using commands like sha256sum to hash files or system components. While this isn’t exactly TPM functionality, it gives you a practical idea of how measurements are generated and verified.
Here are some examples:
1. Generating a Measurement
Let’s say you want to “measure” the integrity of your kernel image (vmlinuz) by generating its hash:
1
2
3
juliet@juliet:~$ sudo sha256sum /boot/vmlinuz-$(uname -r)
88e11de35134f64ca401ce11674b8480e416555255191b8dc95af69ec03cdd80  /boot/vmlinuz-6.8.0-45-generic
This hash 88e11de35134f64ca401ce11674b8480e416555255191b8dc95af69ec03cdd80 here is the measurement of kernel.
2. Extending a Measurement
Extending is basically generating a hash out of a old hash value & the new hash value.
we can simulate it by combining multiple hashes into one using sha256sum.
Let’s say you’ve already hashed the kernel, and now you want to hash another important file (like GRUB, the bootloader). First, hash the GRUB file:
1
2
juliet@juliet:~$ sudo sha256sum /boot/grub/grub.cfg
cd4e9207ab1bc9ac6d7e457190fb3f61af860ef60162ad46531e02850499887a  /boot/grub/grub.cfg
Now, to simulate extending the measurement, combine the kernel hash and GRUB hash by feeding them both into a new hash:
1
2
juliet@juliet:~$ echo -n "88e11de35134f64ca401ce11674b8480e416555255191b8dc95af69ec03cdd80 $(sudo sha256sum /boot/grub/grub.cfg | awk '{print $1}')" | sha256sum
4aaa061e16a129202f174fbef264af2c7340170a4303b9523fac8ef98443b920  -
This new hash 4aaa061e16a129202f174fbef264af2c7340170a4303b9523fac8ef98443b920 represents the combined “measurement” of both the kernel and GRUB respectively in that order. Even if you calculate the hash of GRUB first and then extend with the hash of Kernel , the resultant hash would be a different one than the one above. Which means that the order is also very important.
Platform Configuration Registers (PCR’s)
Think of PCRs like little storage boxes inside the TPM that keep track of important measurements (hash values like above) from your computer. These measurements could be things like which software is running or how your system is set up.
Every time your computer starts, some firmware component of the OS writes the measurements into the TPM and stores them in the PCRs. It does this to make sure that nothing has been changed or tampered with. For example, if someone tries to install unapproved software or change a setting, the PCRs will record the difference.
PCRs are really important because they help ensure that your computer stays secure by making sure everything is exactly how it should be. When you need to check if your system is trustworthy (like during attestation), the TPM will use the information stored in the PCRs to prove that everything is still secure.
In TPM, this is how extending works: new values are hashed together with old ones to produce a chain of integrity measurements.
For example, when a system boots up, the state of certain files or programs (such as bootloader or kernel) is “measured” by firmware components like u-boot generating a hash of their contents. These hashes are stored in TPM’s Platform Configuration Registers (PCRs).
When you extend a PCR in TPM, it doesn’t overwrite the current value of the register; instead, it combines the existing value with the new measurement using a cryptographic hash function (usually SHA-1 or SHA-256). This ensures a consistent chain of measurements over time. This makes tampering hard to hide since every new measurement is tied to the previous one.
Number of PCRs in TPM
The exact number of PCRs depends on the version of TPM you’re using:
- In TPM 2.0, there are at least 24 PCRs like in TPM 1.2, but TPM 2.0 can also support additional banks with different hashing algorithms like SHA-256, SHA-384, and others.
- This allows PCRs to support more advanced cryptographic algorithms and gives the possibility of multiple PCR banks, each corresponding to different hashing algorithms.
PCR Banks in TPM 2.0
TPM 2.0 introduces the concept of multiple PCR banks, each of which can use a different hashing algorithm. Some of the commonly supported hash algorithms include:
- SHA-1
- SHA-256
- SHA-384
- SHA-512
- Others, depending on TPM capabilities.
The number of banks depends on the number of supported algorithms. For example, a TPM that supports both SHA-1 and SHA-256 will have two PCR banks, with each bank containing its own set of PCR registers.
TPM 2.0 typically allows for 24 PCRs per bank, with multiple banks for different algorithms. So, if a TPM supports SHA-1, SHA-256, and SHA-384, it will have 3 banks with 24 PCRs each.
Display the Contents of a PCR
To display the values inside a PCR, you can use a command-line tool such as tpm2-tools
For TPM 2.0, you can use the tpm2_pcrread command. Here’s an example:
1
2
3
4
5
6
7
8
9
10
11
12
13
14
15
16
17
18
19
20
21
22
23
24
25
26
27
28
root@openbmc:~# tpm2_pcrread
  sha1:
  sha256:
    0 : 0x5579389080DA827D061B08067E85134E084272DFEBC1A16DC34767E72A5AFEC9
    1 : 0x91E4E7BF88FF38DF16FDB83E7DAE1E8E705615B46A4A29C5FCAE27C8F7B7C5A8
    2 : 0xE21B703EE69C77476BCCB43EC0336A9A1B2914B378944F7B00A10214CA8FEA93
    3 : 0xE21B703EE69C77476BCCB43EC0336A9A1B2914B378944F7B00A10214CA8FEA93
    4 : 0xE21B703EE69C77476BCCB43EC0336A9A1B2914B378944F7B00A10214CA8FEA93
    5 : 0xE21B703EE69C77476BCCB43EC0336A9A1B2914B378944F7B00A10214CA8FEA93
    6 : 0xE21B703EE69C77476BCCB43EC0336A9A1B2914B378944F7B00A10214CA8FEA93
    7 : 0xE21B703EE69C77476BCCB43EC0336A9A1B2914B378944F7B00A10214CA8FEA93
    8 : 0x952F09E0B212048A5C868256A39D792ADD79A220552DDDCE23E002A13D265AF7
    9 : 0x75CD0299D004D06FF04053D20C1126DA196C20CFCA202A8EFE70482ECB557C5F
    10: 0x0000000000000000000000000000000000000000000000000000000000000000
    11: 0x0000000000000000000000000000000000000000000000000000000000000000
    12: 0x0000000000000000000000000000000000000000000000000000000000000000
    13: 0x0000000000000000000000000000000000000000000000000000000000000000
    14: 0x0000000000000000000000000000000000000000000000000000000000000000
    15: 0x0000000000000000000000000000000000000000000000000000000000000000
    16: 0x0000000000000000000000000000000000000000000000000000000000000000
    17: 0xFFFFFFFFFFFFFFFFFFFFFFFFFFFFFFFFFFFFFFFFFFFFFFFFFFFFFFFFFFFFFFFF
    18: 0xFFFFFFFFFFFFFFFFFFFFFFFFFFFFFFFFFFFFFFFFFFFFFFFFFFFFFFFFFFFFFFFF
    19: 0xFFFFFFFFFFFFFFFFFFFFFFFFFFFFFFFFFFFFFFFFFFFFFFFFFFFFFFFFFFFFFFFF
    20: 0xFFFFFFFFFFFFFFFFFFFFFFFFFFFFFFFFFFFFFFFFFFFFFFFFFFFFFFFFFFFFFFFF
    21: 0xFFFFFFFFFFFFFFFFFFFFFFFFFFFFFFFFFFFFFFFFFFFFFFFFFFFFFFFFFFFFFFFF
    22: 0xFFFFFFFFFFFFFFFFFFFFFFFFFFFFFFFFFFFFFFFFFFFFFFFFFFFFFFFFFFFFFFFF
    23: 0x0000000000000000000000000000000000000000000000000000000000000000
  sha384:
This command will display the values of all PCRs across all banks supported by your TPM, looks like mine only supports SHA-256 bank (24 PCR’s).
To display the value of a specific PCR, for example, PCR 0 in the SHA-256 bank, you can specify the bank and PCR index like this:
1
2
3
root@openbmc:~# tpm2_pcrread sha256:0
  sha256:
    0 : 0x5579389080DA827D061B08067E85134E084272DFEBC1A16DC34767E72A5AFEC9
This will read the contents of PCR 0 using the SHA-256 bank.
Measurements in OpenBMC
In the OpenBMC stack, the u-boot bootloader includes functionality for extending measurements into a TPM’s PCRs (Platform Configuration Registers). Based on the code implementation, u-boot computes cryptographic hashes for various boot components and extends these measurements into specific PCRs within the connected TPM. The assignment of which component’s hash is stored in which PCR follows the guidelines laid out in Table 1 of the TCG Server Management Domain Firmware Profile Specification.
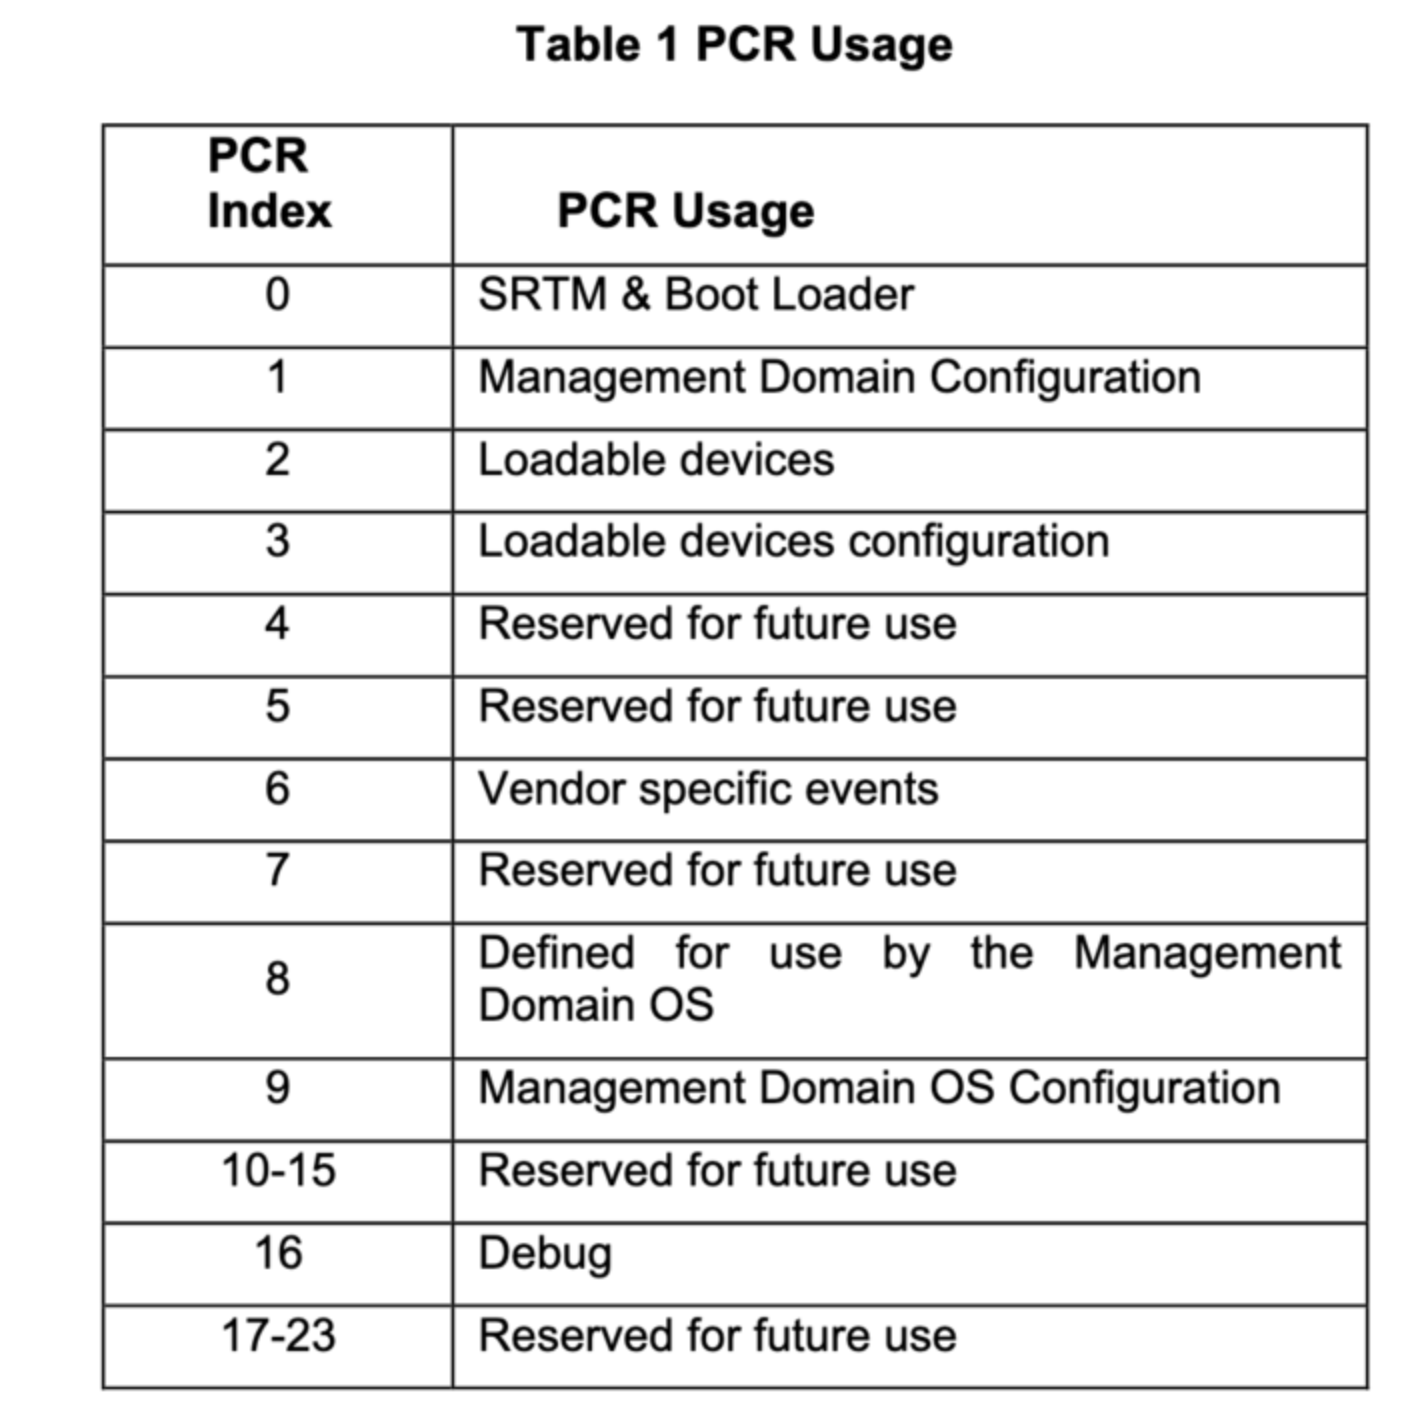
Here is the mapping for the components measured by OpenBMC/u-boot:
- Linux kernel image – extended into PCR 8
- initrd – extended into PCR 9
- Device Tree Blob (dts) – extended into PCR 0
- Boot arguments (bootargs) – extended into PCR 1
To verify these measurements, you can read the PCR values and export them into a binary file for further inspection as shown below:
1
2
3
4
5
6
7
8
9
10
11
12
13
14
15
16
17
18
root@openbmc:~/# tpm2_pcrread sha256:0,1,8,9 -o pcr.bin
  sha256:
    0 : 0x2546B82F8F8B0D6739E610001DF3124FCA2BB9524B01317DC65C9242D77B34E9
    1 : 0x91E4E7BF88FF38DF16FDB83E7DAE1E8E705615B46A4A29C5FCAE27C8F7B7C5A8
    8 : 0x52EE545307AB95207754A9FBB869C3B037EAEA2D386647318E5428EA55904E01
    9 : 0xE60B0323705CCC49DE19FD743BF4121FF88DD302A0E42262EBCEB3A7861DCEF8
root@openbmc:~/# ls
pcr.bin
root@openbmc:~/# hexdump -C pcr.bin
00000000  25 46 b8 2f 8f 8b 0d 67  39 e6 10 00 1d f3 12 4f  |%F./...g9......O| << -- PCR 0
00000010  ca 2b b9 52 4b 01 31 7d  c6 5c 92 42 d7 7b 34 e9  |.+.RK.1}.\.B.{4.| << -- PCR 0
00000020  91 e4 e7 bf 88 ff 38 df  16 fd b8 3e 7d ae 1e 8e  |......8....>}...| << -- PCR 1
00000030  70 56 15 b4 6a 4a 29 c5  fc ae 27 c8 f7 b7 c5 a8  |pV..jJ)...'.....| << -- PCR 1
00000040  52 ee 54 53 07 ab 95 20  77 54 a9 fb b8 69 c3 b0  |R.TS... wT...i..| << -- PCR 8
00000050  37 ea ea 2d 38 66 47 31  8e 54 28 ea 55 90 4e 01  |7..-8fG1.T(.U.N.| << -- PCR 8
00000060  e6 0b 03 23 70 5c cc 49  de 19 fd 74 3b f4 12 1f  |...#p\.I...t;...| << -- PCR 9
00000070  f8 8d d3 02 a0 e4 22 62  eb ce b3 a7 86 1d ce f8  |......"b........| << -- PCR 9
00000080
That’s it for today! Thank you for reading!
In our next article, we will delve into the fascinating process of attestation, which utilizes the measurements we’ve discussed to authenticate the integrity of both hardware and software components. Stay tuned as we explore how this vital process enhances security in modern computing environments.